«Tistory 블로그에서 작성했던 글»
이번에는 저번 포스팅의 번외편으로,
Hibernate가 아닌 MyBatis로 개발환경을 구축 해보자.
Hibernate 관련 포스팅은 아래로..
::: Hibernate 관련 포스팅 :::
[JAVA] Java9 + Spring5 + Gradle + Hibernate 개발환경 만들기
이 포스팅은 기존 포스팅에 이어지는 포스팅으로 아래 포스팅에 이어지는 내용이다.
::: 기존 포스팅 :::
[JAVA] Java9 + Spring5 + Gradle 개발환경 만들기
MyBatis 관련 라이브러리 추가
이전 내용에 이어서 MyBatis 사용을 위해서 build.gradle 파일에 관련 디펜던시 정보를 추가해준다.
build.gradle
1
2
3
4
5
6
7
8
9
10
11
12
13
def ver = {
            ...........,
            mybatis : '3.4.6',
            mybatisSpring : '1.3.2',
            ...........
}

dependencies {
               ...........
               compile group: 'org.mybatis', name: 'mybatis', version: "${ver.mybatis}"
               compile group: 'org.mybatis', name: 'mybatis-spring', version: "${ver.mybatisSpring}"
               ...........
}
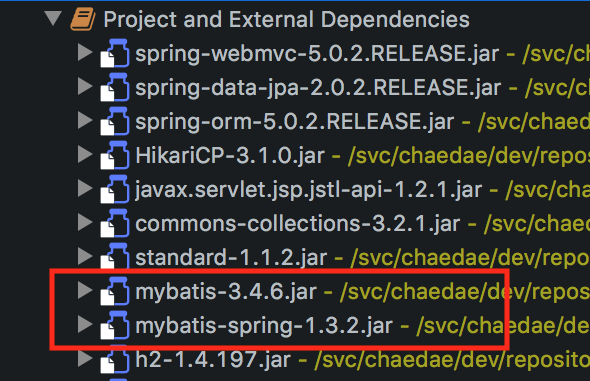
gradle 빌드를 한번 해주면 myBatis 관련 라이브러리가 추가되어 있는 것을 확인할 수 있다.

이제 MyBatis의 기본적인 설정을 위한 설정파일을 생성한다.
경로는 /src/main/resources/sqlmap/config/mybatis-config.xml
환경설정
mybatis-config.xml
1
2
3
4
5
6
7
8
9
10
11
<?xml version="1.0" encoding="UTF-8"?>
<!DOCTYPE configuration PUBLIC "-//www.mybatis.org//DTD Config 3.0//EN" "http://www.mybatis.org/dtd/mybatis-3-config.dtd">

<configuration>
    <settings>
        <setting name="cacheEnabled" value="true" />
        <setting name="mapUnderscoreToCamelCase" value="true" />
        <setting name="logImpl" value="SLF4J" />
    </settings>
</configuration>
기본적으로 전역캐시 설정과 카멜타입 변환, 로그에 대한 설정을 해주었다.
(다른 자세한 설정에 대한 내용은 MyBatis Docs 에서 확인할 수 있다.)
다음으로 프로젝트에서 사용할 MyBatis 설정 파일을 생성한다.

MyBatisConfig.java
1
2
3
4
5
6
7
8
9
10
11
12
13
14
15
16
17
18
19
20
21
22
23
24
25
26
27
28
29
30
31
32
33
34
35
36
37
38
package com.chaedae.db.config;

import java.io.Serializable;
import org.apache.ibatis.annotations.Mapper;
import org.mybatis.spring.SqlSessionFactoryBean;
import org.mybatis.spring.annotation.MapperScan;
import org.springframework.beans.factory.annotation.Autowired;
import org.springframework.context.ApplicationContext;
import org.springframework.context.annotation.Bean;
import org.springframework.context.annotation.Configuration;
import org.springframework.jdbc.datasource.DataSourceTransactionManager;
import org.springframework.transaction.PlatformTransactionManager;
import org.springframework.transaction.annotation.EnableTransactionManagement;

@Configuration
@EnableTransactionManagement
@MapperScan(basePackages = "com.**.dao", annotationClass = Mapper.class)
public class MyBatisConfig extends DataSourceConfig {
    @Autowired
    private ApplicationContext applicationContext;

    @Bean(name = "sqlSession")
    public SqlSessionFactoryBean getSessionFactory() throws Exception {
        SqlSessionFactoryBean sqlSessionFactoryBean = new SqlSessionFactoryBean();
        sqlSessionFactoryBean.setDataSource(this.dataSource());
        sqlSessionFactoryBean.setConfigLocation(applicationContext.getResource("classpath:/sqlmap/config/mybatis-config.xml"));
        sqlSessionFactoryBean.setTypeAliasesPackage("com.chaedae");
        sqlSessionFactoryBean.setTypeAliasesSuperType(Serializable.class);
        sqlSessionFactoryBean.setMapperLocations(applicationContext.getResources("classpath:/sqlmap/mapper/**/*.xml"));

        return sqlSessionFactoryBean;
    }

    @Bean(name = "transactionManager")
    public PlatformTransactionManager getTransactionManager() throws Exception {
        return new DataSourceTransactionManager(this.dataSource());
    }
}
여기서는 SqlSessionFactoryBean을 이용해서 SqlSession에 대한 Bean 생성과 TransacitonManager를 선언해준다.
1
2
3
4
5
 유의사항
  - @MapperScan 어노테이션의 basePackages : MyBatis와 매핑될 Interface 파일들이 있는 경로
  - sqlSessionFactoryBean.setTypeAliasesPackage() : 파라미터, 결과값이 될 VO 객체가 있는 경로
  - sqlSessionFactoryBean.setMapperLocations() : 실제 쿼리가 작성되는 Mapper XML 파일들이 있는 경로
MVC 구성
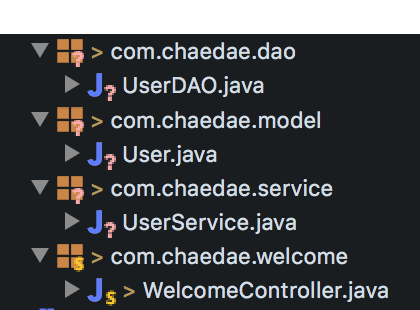
이제 샘플로 적용해 볼 User 객체와 Service, DAO 를 생성하고 이를 화면으로 구현하기 위한 WelcomeController 파일을 수정해준다.

User.java
1
2
3
4
5
6
7
8
9
10
11
12
13
14
15
16
17
package com.chaedae.model;

import java.io.Serializable;
import java.util.Date;

@SuppressWarnings("serial")
public class User implements Serializable {
    String userId;
    String pwd;
    String userNm;
    String hpNo;
    String email;
    Date regDt;
    String regId;

    Getter / Setter
}
UserService.java
1
2
3
4
5
6
7
8
9
10
11
12
13
14
15
16
17
18
19
20
21
package com.chaedae.service;

import java.util.List;
import org.springframework.beans.factory.annotation.Autowired;
import org.springframework.stereotype.Service;
import com.chaedae.dao.UserDAO;
import com.chaedae.model.User;

@Service
public class UserService {
    @Autowired
    private UserDAO userDAO;

    public User selectByUserId(User vo) {
        return userDAO.selectByUserId(vo);
    }

    public List<User> selectUserList(User vo) {
        return userDAO.selectUserList(vo);
    }
}
UserDAO.java (Interface)
1
2
3
4
5
6
7
8
9
10
11
package com.chaedae.dao;

import java.util.List;
import org.apache.ibatis.annotations.Mapper;
import com.chaedae.model.User;

@Mapper
public interface UserDAO {
    public User selectByUserId(User vo);
    public List<User> selectUserList(User vo);
}
WelcomeController.java
1
2
3
4
5
6
7
8
9
10
11
12
13
14
15
16
17
18
19
20
21
22
23
24
25
26
27
28
29
30
31
package com.chaedae.welcome;

import java.text.SimpleDateFormat;
import java.util.Date;
import java.util.Locale;
import org.springframework.beans.factory.annotation.Autowired;
import org.springframework.stereotype.Controller;
import org.springframework.ui.Model;
import org.springframework.web.bind.annotation.GetMapping;
import com.chaedae.model.User;
import com.chaedae.service.UserService;

@Controller
public class WelcomeController {
    @Autowired
    private UserService userService;

    @GetMapping("/")
    public String welcome(Locale locale, Model model) {
        Date date = new Date();
        String simpleDate = new SimpleDateFormat("YYYY년 MM월 dd일 HH:mm:ss").format(date);
        model.addAttribute("time", simpleDate);

        User user = new User();
        user.setUserId("master");
        model.addAttribute("user", this.userService.selectByUserId(user));
        model.addAttribute("userList", this.userService.selectUserList(user));

        return "welcome";
    }
}
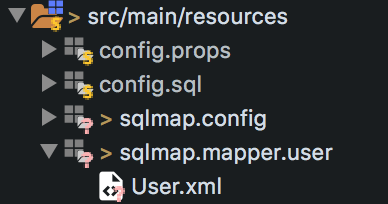
그리고 Mapper XML을 /src/main/resources/sqlmap/mapper/ 경로에 패키지 기준으로 생성해준다.

User.xml
1
2
3
4
5
6
7
8
9
10
11
12
13
14
15
16
17
18
19
20
21
22
23
24
25
26
27
28
29
30
31
<?xml version="1.0" encoding="UTF-8"?>
<!DOCTYPE mapper PUBLIC "-//mybatis.org//DTD Mapper 3.0//EN" "http://mybatis.org/dtd/mybatis-3-mapper.dtd">

<mapper namespace="com.chaedae.dao.UserDAO">
    <select id="selectByUserId" parameterType="User" resultType="User">
        SELECT  U.USERID
                , U.PWD
                , U.USERNM
                , U.HPNO
                , U.EMAIL
                , U.REGDT
                , U.REGID
        FROM    TB_USER U
        WHERE   U.userid = #{useId}
    </select>

    <select id="selectUserList" parameterType="User" resultType="User">
        SELECT  U.USERID
                , U.PWD
                , U.USERNM
                , U.HPNO
                , U.EMAIL
                , U.REGDT
                , U.REGID
        FROM    TB_USER U
        <where>

        </where>
        ORDER BY U.REGDT DESC
    </select>
</mapper>
여기까지 적용이 되면 AppInitializer.java 파일에 MyBatisConfig 파일을 매핑 시켜준다.
AppInitializer.java
1
2
3
4
5
6
7
8
9
10
11
12
13
14
15
16
17
18
19
20
21
22
23
24
25
26
27
28
29
30
31
32
33
34
35
36
37
38
39
40
41
42
43
44
45
46
package com.chaedae.config;

import javax.servlet.Filter;
import org.springframework.web.filter.CharacterEncodingFilter;
import org.springframework.web.servlet.support.AbstractAnnotationConfigDispatcherServletInitializer;
import com.chaedae.db.config.MyBatisConfig;

/**
 * <h1>Deployment Descriptor</h1>
 * old : web.xml
 * @author ChaeDae
 */
public class AppInitializer extends AbstractAnnotationConfigDispatcherServletInitializer{
    /**
     * Database Configuration
     * old : root-context.xml
     */
    @Override protected Class<?>[] getRootConfigClasses() {
        return new Class[] { MyBatisConfig.class};
    }

    /**
     * Servlet Configuration
     * old : servlet-context.xml
     */
    @Override protected Class<?>[] getServletConfigClasses() {
        return new Class[] { ServletConfig.class };
    }

    /**
     * Servlet RequestMapping
     * old : servlet-mapping > url-pattern
     */
    @Override protected String[] getServletMappings() {
        return new String[] {"/"};
    }

    /**
     * Servlet Filter
     * old : filter
     */
    @Override protected Filter[] getServletFilters() {
        CharacterEncodingFilter characterEncodingFilter = new CharacterEncodingFilter("UTF-8", true, true);
        return new Filter[] { characterEncodingFilter };
    }
}
테스트
이제 실제 서버를 구동 해서 화면에서 확인을 해보자.
데이터 확인을 위해 서버 구동 시 샘플 테이블과 데이터를 추가해주는 sql script를 실행할 수 있도록 처리해준다.
테스트를 위해 h2db를 사용 했다.
샘플 테이블과 데이터 SQL Script 파일을 넣어둘 패키지와 파일을 생성한다.

H2DB-schema.sql
1
2
3
4
5
6
7
8
9
10
11
12
13
--------------------------- -- Sample DDL History -- ---------------------------
DROP ALL OBJECTS;

-- User
CREATE TABLE TB_USER (
    USERID VARCHAR2(20) NOT NULL,
    PWD VARCHAR2(128) NOT NULL,
    USERNM VARCHAR2(20) NOT NULL,
    HPNO VARCHAR2(20),
    EMAIL VARCHAR2(50),
    REGDT DATE,
    REGID VARCHAR2(20)
);
H2DB-data.sql
1
2
3
4
5
6
7
8
9
10
11
12
13
14
15
16
17
18
19
20
21
22
23
24
25
26
27
28
29
30
31
32
33
34
35
36
37
38
39
40
41
42
43
44
45
46
47
48
49
50
51
52
53
54
55
56
57
58
59
60
61
62
63
64
65
66
67
68
69
70
71
72
73
74
75
--------------------------- -- Sample DDL History (Data) -- ---------------------------
-- User
INSERT INTO TB_USER (
    USERID
    , PWD
    , USERNM
    , HPNO
    , EMAIL
    , REGDT
    , REGID
) VALUES (
    'master'
    , 'a1234'
    , 'master'
    , '01012345678'
    , 'master@chaedae.com'
    , SYSDATE
    , 'master'
);

INSERT INTO TB_USER (
    USERID
    , PWD
    , USERNM
    , HPNO
    , EMAIL
    , REGDT
    , REGID
) VALUES (
    'test01'
    , 'a1234'
    , 'tester01'
    , '01011112222'
    , 'test01@chaedae.com'
    , SYSDATE
    , 'master'
);

INSERT INTO TB_USER (
    USERID
    , PWD
    , USERNM
    , HPNO
    , EMAIL
    , REGDT
    , REGID
) VALUES (
    'test02'
    , 'a1234'
    , 'tester02'
    , '01033334444'
    , 'test02@chaedae.com'
    , SYSDATE
    , 'master'
);

INSERT INTO TB_USER (
    USERID
    , PWD
    , USERNM
    , HPNO
    , EMAIL
    , REGDT
    , REGID
) VALUES (
    'test03'
    , 'a1234'
    , 'tester03'
    , '01055556666'
    , 'test03@chaedae.com'
    , SYSDATE
    , 'master'
);

commit;
그리고 실행결과를 화면에서 쉽게 출력하기 위해 우선 JSTL 라이브러리를 추가해준다.
build.gradle
1
2
3
4
5
6
7
8
9
10
11
12
13
def ver = {
            ...........,
            jstl: '1.2.1',
            taglib: '1.1.2',
            ...........
}

dependencies {
               ...........
               compile "javax.servlet.jsp.jstl:javax.servlet.jsp.jstl-api:${ver.jstl}"
               compile group: 'taglibs', name: 'standard', version: "${ver.taglib}"
               ...........
}
이제 실제 화면에서 확인할 수 있게 welcome.jsp 파일을 작성해준다.
welcome.jsp
1
2
3
4
5
6
7
8
9
10
11
12
13
14
15
16
17
18
19
20
21
22
23
24
25
26
27
28
29
30
31
32
33
34
35
36
37
38
39
40
41
42
43
44
45
46
47
48
49
50
51
52
53
<%@ page language="java" contentType="text/html; charset=UTF-8" pageEncoding="UTF-8"%>
<%@ taglib prefix="c" uri="http://java.sun.com/jsp/jstl/core" %>
<!DOCTYPE html PUBLIC "-//W3C//DTD HTML 4.01 Transitional//EN" "http://www.w3.org/TR/html4/loose.dtd">
<html>
<head>
    <meta http-equiv="Content-Type" content="text/html; charset=UTF-8">
    <title>Welcome to the Daeyeong world</title>

    <style>
        th, td {
            border: 1px solid black;
        }
    </style>
</head>
<body>
    <div>
        <h1>
            Welcome Spring Gradle Project
        </h1>
        <p>What time is it? ${time}.</p>
    </div>

    <div>
        <div>User ID : ${user.userId} / User Name : ${user.userNm}</div>
        <div>
            <table class="table" style="border: 1px solid black;">
                <caption align="center"><h1>User List</h1></caption>
                <thead>
                    <tr>
                        <th>ID</th>
                        <th>Name</th>
                        <th>Phone</th>
                        <th>Email</th>
                        <th>Join</th>
                    </tr>
                </thead>
                <tbody>
                    <c:forEach var="item" items="${userList}">
                        <tr>
                            <td>${item.userId}</td>
                            <td>${item.userNm}</td>
                            <td>${item.hpNo}</td>
                            <td>${item.email}</td>
                            <td>${item.regDt}</td>
                        </tr>
                    </c:forEach>
                </tbody>
            </table>
        </div>
    </div>

</body>
</html>
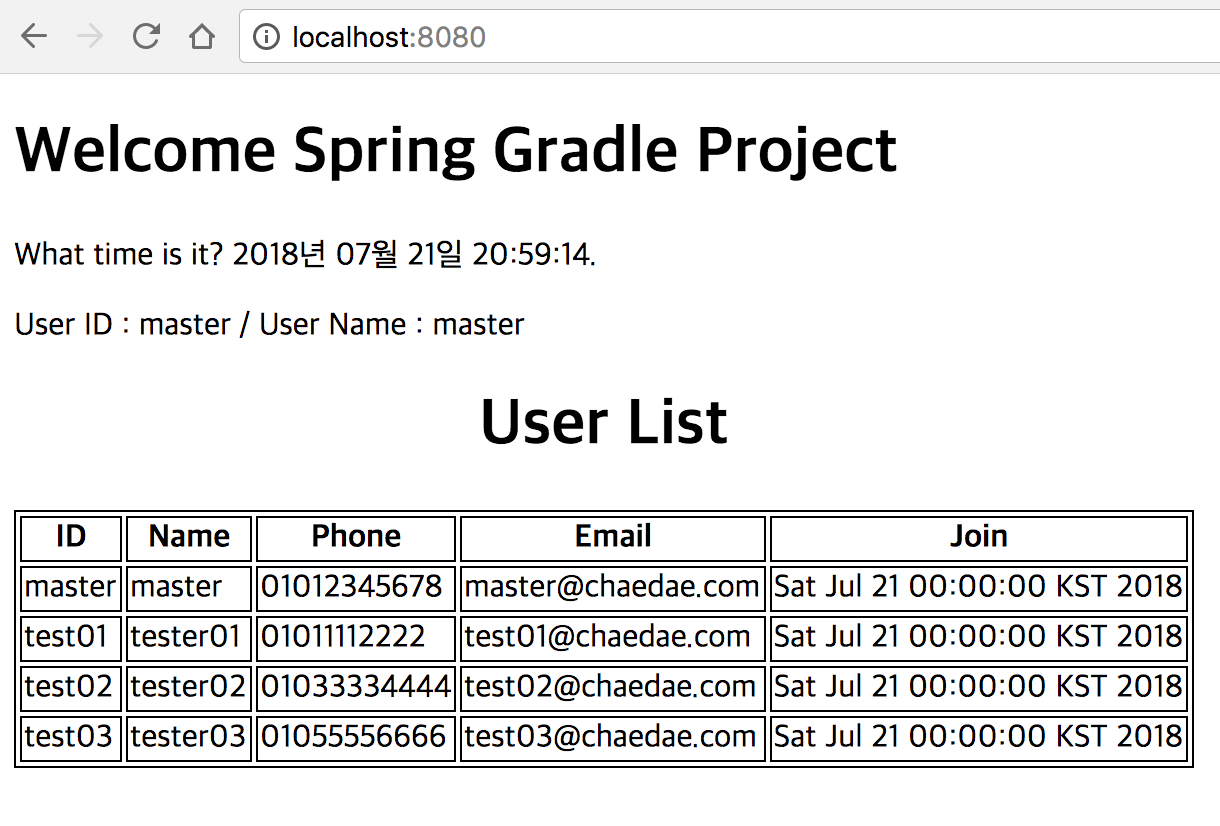
localhost:8080 실행결과

톰캣 구동 시 위와 같은 화면이 출력된다.
해당 내용은 Git에서 받을 수 있다.
:: Git Repo ::
https://github.com/Chaedae/SpringGradleProject/tree/Spring-MyBatis